In an era where home automation is becoming increasingly accessible, the Raspberry Pi 2 stands out as a versatile and cost-effective solution for transforming your living space into a smart home. Whether you’re a tech enthusiast or a beginner, this tiny computer offers endless possibilities for setting up and automating your environment.
This guide will walk you through the essentials of using the Raspberry Pi 2 for smart home applications, from basic setup to integrating it with various smart devices. Discover intriguing automation ideas to enhance daily living and practical solutions to troubleshoot common issues.
Additionally, learn how to bolster your home’s security with innovative applications. Dive into this comprehensive resource and unlock the full potential of your home with the Raspberry Pi 2. Explore Raspberry Pi 2 smart home basics, setup, smart device integration, automation ideas, troubleshooting, and security enhancements in our comprehensive guide.
Table of Contents
Understanding The Basics Of Raspberry Pi 2 For Smart Home
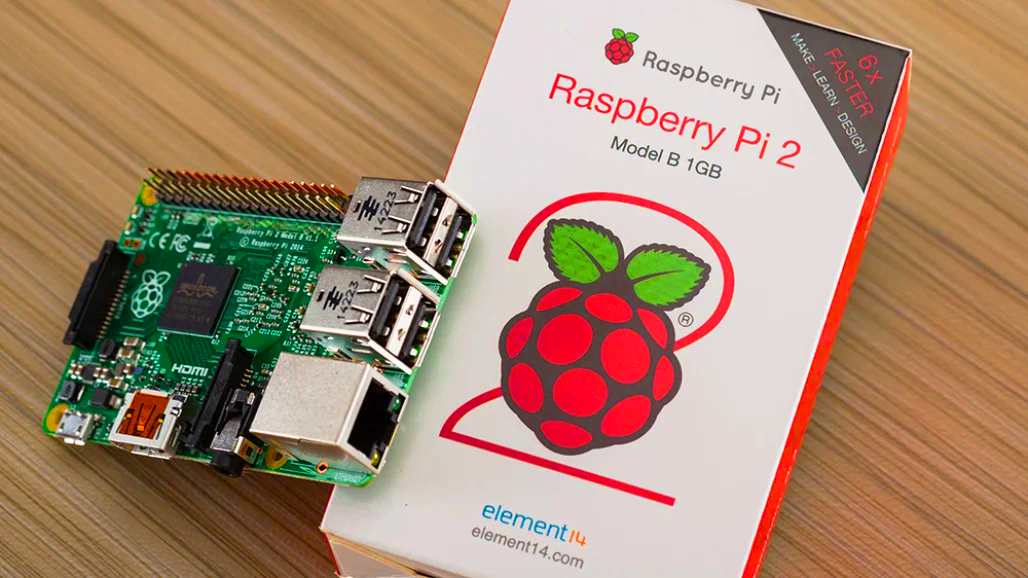
The Raspberry Pi 2 Smart Home setup begins with comprehending the capabilities of this compact yet powerful microcomputer. Designed to be versatile, the Raspberry Pi 2 can support a range of operating systems, making it ideal for various home automation tasks. Its quad-core processor and 1GB RAM provide sufficient power to run multiple applications concurrently, which is essential for managing smart home devices efficiently.
One of the defining features of the Raspberry Pi 2 is its adaptability. With multiple GPIO pins, it allows for direct interfacing with electronic components like sensors, relays, and cameras, enhancing its utility in a smart home ecosystem. Users can easily expand their system by adding more hardware, tailoring the setup to specific needs. This flexibility makes it a popular choice for DIY enthusiasts looking to create custom automation projects.
The Raspberry Pi 2 supports several programming languages, such as Python, C++, and Java, enabling users to write or customize scripts to control their smart devices. For those new to programming, there are numerous online resources and communities to assist in learning how to create effective automation solutions. This open-source adaptability ensures that the Raspberry Pi 2 remains a relevant and robust tool for smart home enthusiasts.
Power efficiency is another advantage of the Raspberry Pi 2 in a smart home setting. It can run 24/7 with minimal electricity consumption, making it a cost-effective solution for continuous monitoring and automation. Whether it’s managing lighting systems, monitoring temperature, or controlling security cameras, the minimal power usage helps keep operational costs low.
Investing time in understanding the basics of setting up and utilizing the Raspberry Pi 2 is crucial for maximizing its potential in a smart home environment. With its affordable price point and vast capabilities, the raspberry pi smart home setup not only enhances convenience but also contributes to a more efficient and intelligent living space. As you delve deeper into its functionalities, the possibilities for automation and innovation are limited only by creativity.
Setting Up Raspberry Pi 2 For Your Smart Home Needs
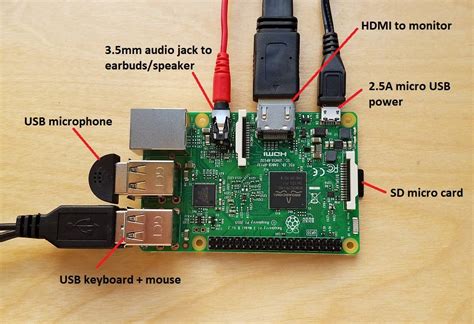
To set up your raspberry pi 2 smart home, the first essential step is gathering all the necessary components. You’ll need a Raspberry Pi 2 model, a microSD card with sufficient storage, a power supply, and a case to protect your device. Ensure you also have an HDMI cable and a display monitor for initial configuration, as well as a keyboard and mouse to navigate the setup process. Having these components ready will enable a smooth installation and configuration of your smart home system.
Once your hardware is assembled, the next step is to install a suitable operating system (OS) on your Raspberry Pi 2. The most recommended OS for raspberry pi smart home projects is the Raspberry Pi OS (formerly Raspbian). This OS is lightweight, and versatile, and supports a wide array of smart home applications. Use a tool like Raspberry Pi Imager to flash the OS onto the microSD card, then insert the card into the Raspberry Pi 2 and power it on to begin the setup.
With the OS up and running, you’ll need to configure your Raspberry Pi 2 to connect to your home network. Start by accessing the network settings through the desktop or using the terminal if you prefer command-line inputs. Configure your device for either a wired Ethernet connection or a Wi-Fi setup, depending on your home’s layout and device positioning. Ensuring a stable network connection is critical as it forms the backbone of communication between your Raspberry Pi 2 and other smart devices.
Security is a pivotal aspect of any raspberry pi 2 smart home setup. Once connected to the network, immediately change default passwords for your Raspberry Pi OS to prevent unauthorized access. Additionally, enable any firewalls provided within the OS and keep your software updated to the latest versions to patch potential vulnerabilities. Taking these precautionary steps will help safeguard your smart home network from external threats.
After securing your device, the final major step in setting up your Raspberry Pi 2 involves installing and configuring the necessary software for smart home automation. Popular platforms like Home Assistant or OpenHAB can be integrated into your Raspberry Pi 2 to manage and automate various smart home devices. Follow the installation guides specific to your chosen platform, and customize it according to your automation needs and preferences. With everything in place, your Raspberry Pi 2 will become a central hub for controlling and enhancing your smart home environment.
Connecting Smart Devices With Raspberry Pi 2
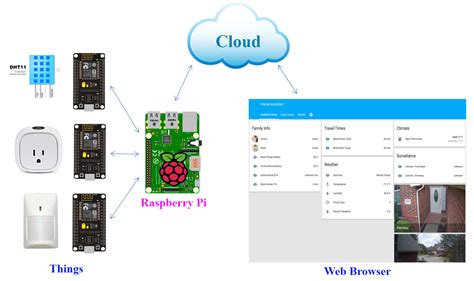
Integrating smart devices with a Raspberry Pi 2 smart home setup can significantly enhance your home’s automation capabilities. The Raspberry Pi 2 serves as an ideal hub for connecting and managing various smart devices due to its flexibility and affordability. To begin with, understanding the communication protocols your devices use, such as Zigbee, Z-Wave, or Wi-Fi, is crucial. The Raspberry Pi 2 can interface with these protocols using additional modules or USB dongles, providing a seamless connection to your smart ecosystem.
Once you’ve established the necessary connections, the next step is to configure your Raspberry Pi 2 to recognize and control these devices. This typically involves setting up software platforms like Home Assistant or OpenHAB, both of which are compatible with a wide range of smart devices. These platforms allow your Raspberry Pi smart home to communicate with and manage connected devices through a user-friendly interface, enabling you to control them from your smartphone or computer.
For more advanced users, custom scripts can be written to automate specific tasks or responses, integrating various devices for a more cohesive smart home experience. Scripts can be written in Python, taking advantage of the Pi’s capabilities to handle multiple tasks. For instance, you can program the Raspberry Pi 2 to trigger your smart lights and thermostat based on the time of day or your geographical location using location-based services.
Security is another critical aspect when connecting smart devices to your Raspberry Pi 2. Ensure you regularly update your system to protect it from vulnerabilities. Additionally, using secure passwords and encrypting communications between devices can keep your Raspberry Pi 2 smart home secure from unauthorized access. Implementing VPNs or firewalls can further safeguard your smart home network.
Finally, testing is an essential part of the integration process. Test each device connection and automation rule to ensure they function correctly within your Raspberry Pi smart home setup. Regular testing can help identify issues early and maintain a robust, fully automated environment. With careful planning and configuration, your Raspberry Pi 2 can become the heart of a powerful and flexible smart home system.
Automation Ideas With Raspberry Pi 2 For A Smarter Home
Transforming your house into a connected living space is easier with raspberry pi 2 smart home solutions. One popular automation idea is setting up a DIY smart lighting system. By connecting smart bulbs with your Raspberry Pi 2, you can control lighting via mobile apps or voice commands. This setup not only improves convenience but also enhances energy efficiency.
Another exciting project for a raspberry pi smart home is the creation of a weather station. Using sensors that detect temperature, humidity, and atmospheric pressure, you can gather real-time data to optimize your home’s environment. Integrate this data with your HVAC system, and Raspberry Pi can automate adjustments to keep your home comfortable and efficient.
Security automation is a top priority in any smart home. Integrate Raspberry Pi 2 with IP cameras around your property for a robust surveillance system. Use facial recognition software to detect familiar faces, and set alerts for unrecognized visitors, enhancing the safety of your home.
For entertainment, Raspberry Pi 2 can be transformed into a media center. With software like Kodi, you can automate your media library, stream content across devices, and use voice commands or remote controls for a seamless viewing experience. This not only increases accessibility but also centralizes your media management.
Lastly, consider using Raspberry Pi 2 for smart gardening. By connecting moisture and light sensors to your garden’s irrigation system, you can automate watering processes based on environmental conditions. This raspberry pi smart home automation ensures healthier plants with minimal manual intervention, reflecting a truly smart lifestyle.
Troubleshooting Common Issues In Raspberry Pi 2 Smart Home
Setting up a raspberry pi 2 smart home can sometimes be accompanied by a few technical hiccups. Here’s a guide to help you get past some of the standard roadblocks.
- Device Connectivity Issues: If your smart devices are struggling to connect with your Raspberry Pi 2, ensure that they are on the same network. Double-check the settings on both the device and raspberry pi smart home system to ensure proper pairing protocols.
- Power Supply Problems: An inadequate power supply can cause your Raspberry Pi 2 to behave erratically. Make sure you are using a power supply that provides at least 5V, 2.5A. An underpowered Pi can cause hardware failures and unreliable performance.
- Overheating Issues: If your Raspberry Pi 2 overheats, it may throttle its CPU to cool down, affecting system performance. Use a heat sink or a cooling fan to mitigate heat problems, especially in continuously running setups.
- Software Glitches: Incompatible software or plugins might crash the system or cause it to hang. Always ensure that your operating system and any associated software are up to date. Explore community forums for troubleshooting specific software issues.
- Network Configuration Errors: Incorrect network settings can prevent the Raspberry Pi 2 from communicating with other devices or accessing the internet. Check your network configuration files for any errors, and confirm that the WiFi credentials are correct.
- Service Failures: Services like Home Assistant or other automation tools may fail to start. Use command line tools to restart these services and check logs for errors that could provide insights into the issues.
When faced with difficulties, remember to reference the expansive online Raspberry Pi community. User forums and official documentation can be invaluable resources for resolving unique challenges in crafting your perfect raspberry pi 2 smart home setup.
Enhancing Security With Raspberry Pi 2 Smart Home Solutions
Incorporating Raspberry Pi 2 smart home solutions can significantly bolster the security of your home without breaking the bank. The flexibility and affordability of the Raspberry Pi 2 make it an ideal choice for creating a custom security system. One popular application is setting up a surveillance system with Pi-compatible cameras. By connecting these cameras to your Raspberry Pi smart home network, you can monitor your premises in real-time, receiving alerts for any unusual activities.
Another effective way to leverage the raspberry pi 2 smart home for enhanced security is integrating motion detectors and smart door locks. With the Raspberry Pi as the central hub, these devices can be programmed to trigger alerts or activate cameras when motion is detected. This ensures that you are always informed of any unauthorized entries, allowing you to take action promptly.
Enhancing your home security with the Raspberry Pi 2 also involves creating automated routines. For instance, you can set up a script to activate lights when motion is detected or schedule lights to randomly turn on and off when you are away to give the impression that someone is home. These simple automations can deter potential intruders, making your home safer.
Data security is also crucial when dealing with a raspberry pi smart home system. Implementing strong passwords and regularly updating the firmware of your Raspberry Pi will help protect against hacking attempts. Additionally, using a Virtual Private Network (VPN) can encrypt your data, ensuring secure remote access to your network.
Finally, regular maintenance and system checks are essential to maintaining the integrity of your raspberry pi 2 smart home security solutions. Scheduling routine software updates and testing the functionality of connected devices will help you identify and rectify any vulnerabilities promptly. By keeping the system updated and running efficiently, you can maintain a robust and reliable security setup, providing peace of mind for you and your family.


so what do you think the final cost would be?
depends on where you buy gadgets from..